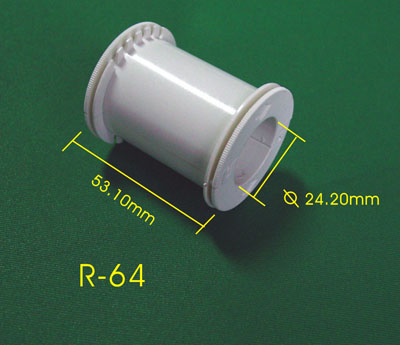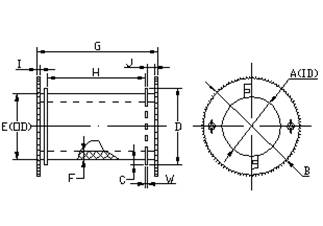
According to the design to check the main design size: R-64 inside
Icon code
|
Design size
|
Tolerance
|
A
|
24.20
|
Minimum value
|
|
B
|
43.60
|
The maximum value
|
|
C
|
3.60
|
Minimum value
|
|
D
|
33.50
|
Reference
|
|
E
|
26.30
|
Reference
|
|
F
|
1.05
|
±0.10
|
|
G
|
53.10
|
The maximum value
|
|
H
|
44.30
|
±0.30
|
|
I
|
1.50
|
±0.10
|
|
J
|
2.50
|
±0.10
|
|
W
|
1.00
|
Reference
|
● Detection tool:digital caliper or micrometer.
● Indicate the code for inspection.
● the number of outlet slot 5×2,hanging hook 2.
● hole A is not roundness≤0.30mm,both sides of the hobbing plane unevenness≤0.30mm,no significant warping.
● hole hole anastomosis is not allowed to have a step,feel smooth and unimpeded.
● no residual shape or damage,color is no different normal
● finish up to▽7 or more,but allow for harmless scars and miniatures.
● Metal-free impurities or other debris,containing metal,debris products,must be waste separation.
● no melting marks,no internal pores bright spot.There are stomatal highlights(excluding melting marks)products for foreign goods.
● no flash,burr and excess material.Key parts of the burr≤0.05 mm.
● anti-pressure≥25 kg/square centimeter,no damage.
● feel a strong elasticity,and not brittle.
● hardness,wear resistance are suitable for high-speed heavy-duty rotation.
● Selection of raw materials must meet the requirements of the EU ROHS directive,and has UL yellow card certification and fixed-point supply.
● heat distortion temperature≥120 degrees Celsius,insulation resistance must be≥1000M ohm,flame retardant UL94Vo level/0.8-3.2mm.
● other structures should meet the transformer manufacturing process as the standard.

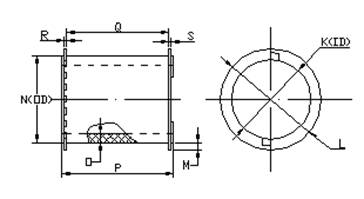
According to the design to check the main design size: R-64 outside
Icon code
|
Design size
|
Tolerance
|
|
K
|
33.80
|
±
|
|
L
|
43.50
|
The maximum value
|
|
M
|
3.80
|
Minimum value
|
|
N
|
35.90
|
±
|
|
O
|
1.05
|
±0.10
|
|
P
|
48.50
|
±
|
|
Q
|
44.20
|
±0.30
|
|
R
|
1.10
|
±
|
|
S
|
1.00
|
±
|
● Detection tool:digital caliper or micrometer.
● Indicate the code for inspection.
● The number of outlet slots is 7×2.
● hole K is not roundness≤0.30mm,with the inner shell D size with the appropriate fit.
● hole hole anastomosis is not allowed to have a clear step,two pieces of flat after no obvious warping,splicing seam≤0.20mm.
● shape no defect or damage,allowing anastomosis in the absence of defects,color is no different normal
● finish up to▽7 or more,but allow for harmless scars and miniatures.
● Metal-free impurities or other debris,containing metal,debris products,must be waste separation.
● no melting marks,no internal pores bright spot.There are stomatal highlights(excluding melting marks)products for foreign goods.
● no flash,burr and excess material.Key parts of the burr≤0.05 mm.
● anti-pressure≥25 kg/square centimeter,no damage.
● feel a strong elasticity,and not brittle.
● Selection of raw materials must meet the requirements of the EU ROHS directive,and has UL yellow card certification and fixed-point supply.
● heat distortion temperature≥120 degrees Celsius,insulation resistance must be≥1000M ohm,flame retardant UL94Vo level/0.8-3.2mm.
● other structures should meet the transformer manufacturing process as the standard.


